Pytorch学习笔记
前言
以前一直使用TensorFlow 的keras库,但人毕竟要跟上潮流,pytorch早晚能占据绝大部分市场
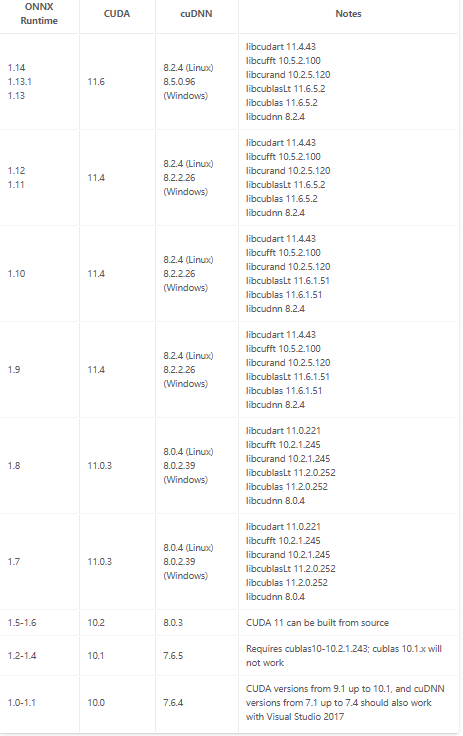
前置需求——cuda、cudnn、tensorrt版本对应要求
找老半天,终于在onnx官网弄到全部的资料,链接如下:
https://onnxruntime.ai/docs/execution-providers
具体表格如图:(cuda、tensorrT、onnx版本关系)
| ONNX Runtime | TensorRT | CUDA | | | | | | | |
|———————|—————|————-|—-|—-|—-|—-|—-|—-|—-|
| main | 8.5 | 11.6 | | | | | | | |
| 1.14 | 8.5 | 11.6 | | | | | | | |
| 1.12-1.13 | 8.4 | 11.4 | | | | | | | |
| 1.11 | 8.2 | 11.4 | | | | | | | |
| 1.10 | 8.0 | 11.4 | | | | | | | |
| 1.9 | 8.0 | 11.4 | | | | | | | |
| 1.7-1.8 | 7.2 | 11.0.3 | | | | | | | |
| 1.5-1.6 | 7.1 | 10.2 | | | | | | | |
| 1.2-1.4 | 7.0 | 10.1 | | | | | | | |
另外一张,因为太大了只能用图片表示:
Main
卷积神经网络
| 参数 | 参数类型 | ||
|---|---|---|---|
in_channels |
int | Number of channels in the input image | 输入图像通道数 |
out_channels |
int | Number of channels produced by the convolution | 卷积产生的通道数 |
kernel_size |
(int or tuple) | Size of the convolving kernel | 卷积核尺寸,可以设为1个int型数或者一个(int, int)型的元组。例如(2,3)是高2宽3卷积核 |
stride |
(int or tuple, optional) | Stride of the convolution. Default: 1 | 卷积步长,默认为1。可以设为1个int型数或者一个(int, int)型的元组。 |
padding |
(int or tuple, optional) | Zero-padding added to both sides of the input. Default: 0 | 填充操作,控制padding_mode的数目。 |
padding_mode |
(string, optional) | ‘zeros’, ‘reflect’, ‘replicate’ or ‘circular’. Default: ‘zeros’ | padding模式,默认为Zero-padding 。 |
dilation |
(int or tuple, optional) | Spacing between kernel elements. Default: 1 | 扩张操作:控制kernel点(卷积核点)的间距,默认值:1。 |
groups |
(int, optional) | Number of blocked connections from input channels to output channels. Default: 1 | group参数的作用是控制分组卷积,默认不分组,为1组。 |
bias |
(bool, optional) | If True, adds a learnable bias to the output. Default: True | 为真,则在输出中添加一个可学习的偏差。默认:True。 |
vit-pytorch库
使用方法:
1 | import torch |
参数:
image_size: int.
图像的大小。如果你有矩形图像,请确保你的图像大小是宽度和高度的最大值patch_size: int.
补丁数量。’ image_size ‘必须被’ patch_size ‘整除。
补丁数量为:’ n = (image_size // patch_size) 2 ‘,且’ n ‘ 必须大于16**。num_classes: int.
要分类的类数。dim: int.
线性变换后输出张量的最后一个维数nn.Linear(..., dim).depth: int.
Transformer blocks 数量heads: int.
多头注意层中的头数。mlp_dim: int.
MLP(前馈)层的尺寸channels: int, default3.
图像的通道数。dropout: float between[0, 1], default0..
Dropout 大小,通常0.2左右emb_dropout: float between[0, 1], default0.
Embedding dropout rate.pool: string, eitherclstoken pooling ormeanpooling
查看模型方法
对于pytorch模型,记得最开始是pt,后来又出现一堆别名,但总体而言大差不差。由于pytorch“推荐保存权重不保结构”的特性,很多时候我们copy的预训练模型无法直观地分析结构以微调,在此梳理一下解决方法和逻辑。
一、直接print(model),会显示一大串文字,大括号
ViT(
(to_patch_embedding): Sequential(
(0): Rearrange('b c (h p1) (w p2) -> b (h w) (p1 p2 c)', p1=32, p2=32)
(1): LayerNorm((3072,), eps=1e-05, elementwise_affine=True)
(2): Linear(in_features=3072, out_features=1024, bias=True)
(3): LayerNorm((1024,), eps=1e-05, elementwise_affine=True)
)
(dropout): Dropout(p=0.1, inplace=False)
(transformer): Transformer(
(layers): ModuleList(
(0): ModuleList(
(0): PreNorm(
(norm): LayerNorm((1024,), eps=1e-05, elementwise_affine=True)
(fn): Attention(
(attend): Softmax(dim=-1)
(dropout): Dropout(p=0.1, inplace=False)
(to_qkv): Linear(in_features=1024, out_features=3072, bias=False)
(to_out): Sequential(
(0): Linear(in_features=1024, out_features=1024, bias=True)
(1): Dropout(p=0.1, inplace=False)
)
)
)
(1): PreNorm(
(norm): LayerNorm((1024,), eps=1e-05, elementwise_affine=True)
(fn): FeedForward(
(net): Sequential(
(0): Linear(in_features=1024, out_features=2048, bias=True)
(1): GELU(approximate=none)
(2): Dropout(p=0.1, inplace=False)
(3): Linear(in_features=2048, out_features=1024, bias=True)
(4): Dropout(p=0.1, inplace=False)
)
)
)
)
(1): ModuleList(
(0): PreNorm(
(norm): LayerNorm((1024,), eps=1e-05, elementwise_affine=True)
(fn): Attention(
(attend): Softmax(dim=-1)
(dropout): Dropout(p=0.1, inplace=False)
(to_qkv): Linear(in_features=1024, out_features=3072, bias=False)
(to_out): Sequential(
(0): Linear(in_features=1024, out_features=1024, bias=True)
(1): Dropout(p=0.1, inplace=False)
)
)
)
(1): PreNorm(
(norm): LayerNorm((1024,), eps=1e-05, elementwise_affine=True)
(fn): FeedForward(
(net): Sequential(
(0): Linear(in_features=1024, out_features=2048, bias=True)
(1): GELU(approximate=none)
(2): Dropout(p=0.1, inplace=False)
(3): Linear(in_features=2048, out_features=1024, bias=True)
(4): Dropout(p=0.1, inplace=False)
)
)
)
)
(2): ModuleList(
(0): PreNorm(
(norm): LayerNorm((1024,), eps=1e-05, elementwise_affine=True)
(fn): Attention(
(attend): Softmax(dim=-1)
(dropout): Dropout(p=0.1, inplace=False)
(to_qkv): Linear(in_features=1024, out_features=3072, bias=False)
(to_out): Sequential(
(0): Linear(in_features=1024, out_features=1024, bias=True)
(1): Dropout(p=0.1, inplace=False)
)
)
)
(1): PreNorm(
(norm): LayerNorm((1024,), eps=1e-05, elementwise_affine=True)
(fn): FeedForward(
(net): Sequential(
(0): Linear(in_features=1024, out_features=2048, bias=True)
(1): GELU(approximate=none)
(2): Dropout(p=0.1, inplace=False)
(3): Linear(in_features=2048, out_features=1024, bias=True)
(4): Dropout(p=0.1, inplace=False)
)
)
)
)
(3): ModuleList(
(0): PreNorm(
(norm): LayerNorm((1024,), eps=1e-05, elementwise_affine=True)
(fn): Attention(
(attend): Softmax(dim=-1)
(dropout): Dropout(p=0.1, inplace=False)
(to_qkv): Linear(in_features=1024, out_features=3072, bias=False)
(to_out): Sequential(
(0): Linear(in_features=1024, out_features=1024, bias=True)
(1): Dropout(p=0.1, inplace=False)
)
)
)
(1): PreNorm(
(norm): LayerNorm((1024,), eps=1e-05, elementwise_affine=True)
(fn): FeedForward(
(net): Sequential(
(0): Linear(in_features=1024, out_features=2048, bias=True)
(1): GELU(approximate=none)
(2): Dropout(p=0.1, inplace=False)
(3): Linear(in_features=2048, out_features=1024, bias=True)
(4): Dropout(p=0.1, inplace=False)
)
)
)
)
(4): ModuleList(
(0): PreNorm(
(norm): LayerNorm((1024,), eps=1e-05, elementwise_affine=True)
(fn): Attention(
(attend): Softmax(dim=-1)
(dropout): Dropout(p=0.1, inplace=False)
(to_qkv): Linear(in_features=1024, out_features=3072, bias=False)
(to_out): Sequential(
(0): Linear(in_features=1024, out_features=1024, bias=True)
(1): Dropout(p=0.1, inplace=False)
)
)
)
(1): PreNorm(
(norm): LayerNorm((1024,), eps=1e-05, elementwise_affine=True)
(fn): FeedForward(
(net): Sequential(
(0): Linear(in_features=1024, out_features=2048, bias=True)
(1): GELU(approximate=none)
(2): Dropout(p=0.1, inplace=False)
(3): Linear(in_features=2048, out_features=1024, bias=True)
(4): Dropout(p=0.1, inplace=False)
)
)
)
)
(5): ModuleList(
(0): PreNorm(
(norm): LayerNorm((1024,), eps=1e-05, elementwise_affine=True)
(fn): Attention(
(attend): Softmax(dim=-1)
(dropout): Dropout(p=0.1, inplace=False)
(to_qkv): Linear(in_features=1024, out_features=3072, bias=False)
(to_out): Sequential(
(0): Linear(in_features=1024, out_features=1024, bias=True)
(1): Dropout(p=0.1, inplace=False)
)
)
)
(1): PreNorm(
(norm): LayerNorm((1024,), eps=1e-05, elementwise_affine=True)
(fn): FeedForward(
(net): Sequential(
(0): Linear(in_features=1024, out_features=2048, bias=True)
(1): GELU(approximate=none)
(2): Dropout(p=0.1, inplace=False)
(3): Linear(in_features=2048, out_features=1024, bias=True)
(4): Dropout(p=0.1, inplace=False)
)
)
)
)
)
)
(to_latent): Identity()
(mlp_head): Sequential(
(0): LayerNorm((1024,), eps=1e-05, elementwise_affine=True)
(1): Linear(in_features=1024, out_features=128, bias=True)
))
以VIT_transformer为例,其中每一层都可以通过model.xx的方式访问,如果你想改变某一层,可以先torch.nn.定义层,再直接用等号赋值即可。但print输出的模型结构并不准确,有时混乱的结构很容易找错位置,因此需要第二种方法。
二、使用netron(强烈推荐)
如果直接netron.start预训练模型,就会发现只有显示部分的框框而没有连接线,因此得先随机一个输入向量,转化成onnx模型,再查看,在这里显示的模型名字、权重、方向都很全,而且可以直接在游览器内看某一层用法。当我们想改变某一层时,以vit_transformer的head为例model.heads.head=即可。
转换onnx代码如下:
1 | t = torch.from_numpy(img).cuda() # torch.Size([600, 800, 4]) |
其中V指需要被转换的模型,t是一次的输入,随机或样本都可以,只是我们得在输入前加一个维度(等效batchsize=1),第三个参数是保存路径
如图所示,是transformer模型,更改head为128维度的结果:
关于transformer及其变体的一些研究
没地方放,就全部丢这里,将就下
swin transformer
pytorch自带库,以及一些预训练模型,当然这些模型最好不要直接拿来用,还是得修改修改,链接如下:
SwinTransformer — Torchvision main documentation (pytorch.org)
在该模型后接一个(1000,3)的全连接层。
随后,我做了一个特殊的数据集:
数据集a:一个对象刚好覆盖图片正中央。
数据集b:图片中没有该对象或者该对象未覆盖图片正中央。
从结果来看它能够关联位置信息,这是一件非常了不起的事情,这就意味着:如果不要求高精度,我们就可以将繁杂的目标检测任务变成一个多分类问题。该结论正好符合最初设想:所有任务可以转化成有限个分类问题的叠加。